

|
|
|
![]()
|
Table of
Contents |
![]()
Processing audio with HyperEngine requires the creation of an FX document. This example shows how to create an FX document to process an existing sound file stored on your hard drive.
![]() Go to the File Menu
Go to the File Menu
![]() Choose New -> File
Document, or simply use the keyboard shortcut, Command-N.
Choose New -> File
Document, or simply use the keyboard shortcut, Command-N.
A Dialog box will appear, asking you to select a sound file to work with:
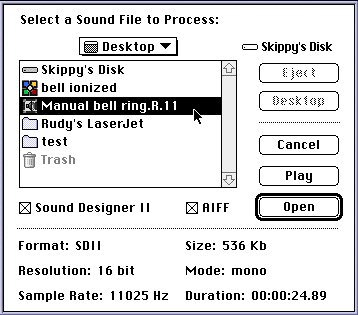
select a sound file from your hard drive for processing
![]() Choose a sound file and
click Open (or press either the Return or Enter keys, which are the
shortcuts for clicking Open).
Choose a sound file and
click Open (or press either the Return or Enter keys, which are the
shortcuts for clicking Open).
![]() A New FX document
reference window will appear along with a graphical overview showing
the audio in the sound file you just selected. Depending on the
length of the sound file, the overview may take a few moments to
calculate.
A New FX document
reference window will appear along with a graphical overview showing
the audio in the sound file you just selected. Depending on the
length of the sound file, the overview may take a few moments to
calculate.
![]() Note that you can
only create one FX document per sound file at a time. Attempting to
select a file that is already open will result in an error
message.
Note that you can
only create one FX document per sound file at a time. Attempting to
select a file that is already open will result in an error
message.
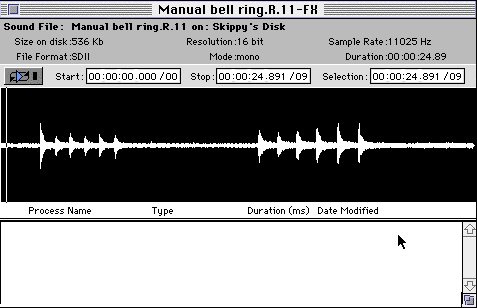
the FX document reference window, with waveform overview displayed
![]() You have just
created a new FX document. Save it, using the File menu command (or
Command-S).
You have just
created a new FX document. Save it, using the File menu command (or
Command-S).
The top of the FX document reference window is a title bar which by default specifies the name of the original input sound file appended to the suffix "-FX." This helps you differentiate between a HyperEngine (-FX) document and the original sound file. Below the title bar is a gray zone containing the following general information about the sound file:
A waveform overview appears below the header information. This overview is provided for you to select the range of audio you want to audition or process. You may use the mouse to click and drag in the waveform overview to create a selection. Type Command-A, or use the Select All option in the Edit menu, to select the entire file for preview and processing.
![]() Click on the magnifying glass icons (at the bottom
right hand side of the waveform overview) to increase or decrease
your view resolution. Note that the display stays centered on the
current cursor position within the waveform overview as you zoom in
and out. At higher resolutions, you'll need to use the scroll bar
beneath the waveform overview to navigate through the file.
Command - ] (end bracket) is
the keyboard shortcut for Zoom In; command - [ (start bracket) is the
keyboard shortcut for Zoom Out.
Click on the magnifying glass icons (at the bottom
right hand side of the waveform overview) to increase or decrease
your view resolution. Note that the display stays centered on the
current cursor position within the waveform overview as you zoom in
and out. At higher resolutions, you'll need to use the scroll bar
beneath the waveform overview to navigate through the file.
Command - ] (end bracket) is
the keyboard shortcut for Zoom In; command - [ (start bracket) is the
keyboard shortcut for Zoom Out.
Below the waveform overview is the list of effects. When a new document is created, this list is empty. You may add effects by selecting them from the Plug-Ins menu. Access the effects in your document by clicking on their entries in the List. You also enable/disable the processing in the List of Effects.
Once you have created an FX document, you can add one or more HyperEngine compatible effects to it. In this example, we will add an Ionizer effect but the procedure is the same for adding a Ray Gun effect.
![]() From the Plug-Ins menu,
choose Ionizer.
From the Plug-Ins menu,
choose Ionizer.
![]() The Ionizer will be added
to the list of effects in the FX window. The process name is
"untitled" by default (as displayed below):
The Ionizer will be added
to the list of effects in the FX window. The process name is
"untitled" by default (as displayed below):
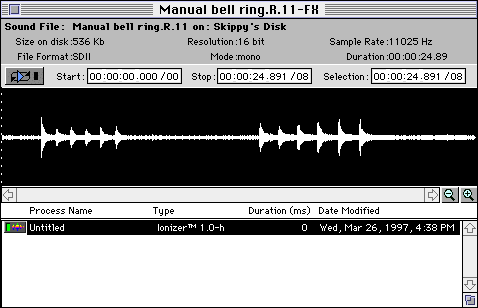
![]() Click on the Ionizer entry
in the list of effects to call up the Ionizer window.
Click on the Ionizer entry
in the list of effects to call up the Ionizer window.
You may now begin experimenting with effect variations. Experiment with effect settings as described in the documentation supplied with your effects packages.
![]() Select the effect you want
to delete by clicking on the List of Effects. The entry will be
highlighted.
Select the effect you want
to delete by clicking on the List of Effects. The entry will be
highlighted.
![]() Hit the Delete key on your
keypad
Hit the Delete key on your
keypad
![]() The effect will be
deleted.
The effect will be
deleted.
![]() Note that there
is no "Undo" after this function!
Note that there
is no "Undo" after this function!
Since you can add more than one effect variation to an FX document, you may want to name them to help tell them apart.
To Name an effect in the FX document reference window:
![]() Select the effect you want
to name by clicking on the List of Effects.
Select the effect you want
to name by clicking on the List of Effects.
![]() Choose Get Info from the
File menu.
Choose Get Info from the
File menu.
![]() The Process Info dialog
will appear.
The Process Info dialog
will appear.
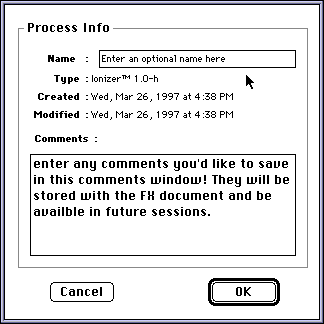
![]() Enter the new name and any
optional comments and click OK.
Enter the new name and any
optional comments and click OK.
![]() The effect will appear
with your new name in the FX window's List of Effects.
The effect will appear
with your new name in the FX window's List of Effects.
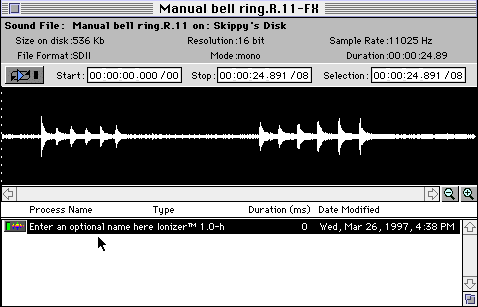
It is possible to have multiple effects active in the HyperEngine window simultaneously. Each effect may be engaged or bypassed individually. Every effect in the HyperEngine document window includes its own Bypass button. Simply click the button to bypass or engage that particular effect. When the button is illuminated, the effect process is engaged. When an effect's process is engaged, you'll hear its effect on the sound, even though the particular effect's screen (Ionizer's Green Window, in this example) is closed.
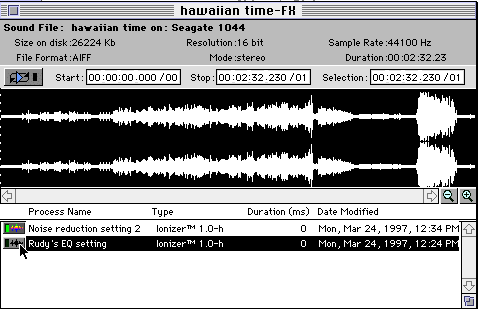
The Ionizer plug-in named "Rudy's EQ setting" is bypassed, while "noise reduction setting 2" is still engaged.
 All effects can be
bypassed by clicking the center button of the center row of the
playback palette. To hear effects, click the center button of the
bottom row, as shown in the illustration below:
Once you have adjusted your effect settings to your liking, use the Process to New File command to create a new sound file using the current FX document settings.
To use the Process to New File command:
![]() Select the range of audio
you wish to process by click-dragging in the waveform overview of the
FX document window.
Select the range of audio
you wish to process by click-dragging in the waveform overview of the
FX document window.
![]() Choose the Process to New
File command from the File menu.
Choose the Process to New
File command from the File menu.
![]() Choose the output file
specifications.
Choose the output file
specifications.
![]() If you're saving the sound
as an 8-bit file try the Dither option, which adds a small bit of
noise to the signal to mask the audible effects of the bit
reduction.
If you're saving the sound
as an 8-bit file try the Dither option, which adds a small bit of
noise to the signal to mask the audible effects of the bit
reduction.
![]() The next dialog will ask
you to specify file format (AIFF/SDII), a name for the file and its
target location on disk. Click "Save" (or hit the Return key) to
begin the process. The selected range of audio will be written to
disk.
The next dialog will ask
you to specify file format (AIFF/SDII), a name for the file and its
target location on disk. Click "Save" (or hit the Return key) to
begin the process. The selected range of audio will be written to
disk.
![]() Your original
sound file will be unchanged!
Your original
sound file will be unchanged!
HyperEngine can process audio appearing at your Mac's Sound In device in real time. This will allow you to use HyperEngine much like a hardware processor and frees you from reading and creating new sound files on disk. Use the Mac's microphone port, the inputs on your sound card, or the AppleCD Audio Player to get sound into HyperEngine.
![]() Connect the audio inputs
and outputs of your Mac to the rest of your audio system.
Connect the audio inputs
and outputs of your Mac to the rest of your audio system.
![]() Chose the New Play Thru FX
document item from the File menu and set up your effects as described
previously.
Chose the New Play Thru FX
document item from the File menu and set up your effects as described
previously.
![]() Hit the Play button, and
adjust your input volume using the Faders.
Hit the Play button, and
adjust your input volume using the Faders.
![]() Now select an effect from
the Plug-ins menu and begin processing your sound.
Now select an effect from
the Plug-ins menu and begin processing your sound.
![]()
[Table of Contents] [Getting Started] [HyperEngine Controls] [FX-Documents] [Menu Commands] [Sound Manager] [Ray Gun Manual]